Baking & Pastry > Fillings & Assembly > Cake Assembly Techniques > Crumb Coating Cakes
The Ultimate Crumb Coat for Cakes
Achieve a flawless cake finish with this detailed guide to crumb coating. A crucial step in cake decorating, the crumb coat seals in loose crumbs, creating a smooth canvas for your final frosting layer.

Ingredients
- 1 Cake
- Sufficient to coat cake Frosting (Buttercream or Ganache)
Prepare Your Cake and Frosting
Ensure your cake layers are completely cooled. This prevents the frosting from melting. Prepare your chosen frosting, ensuring it's at a spreadable consistency. If using buttercream, it should be smooth and not too stiff. If using ganache, allow it to cool until it reaches a spreadable consistency.
Level the Cake Layers
Using a serrated knife, carefully level the tops of each cake layer. This ensures a stable and even cake. Remove any domed tops so the cake sits flat.
Apply the First Layer of Frosting (Crumb Coat)
Place one cake layer on your cake stand or serving plate. Using an offset spatula, apply a thin layer of frosting over the top of the first layer. The goal here is not to create a thick, perfect layer, but to trap any loose crumbs.
Stack and Frost
Carefully place the next cake layer on top of the frosted layer. Repeat the process of applying a thin layer of frosting. Continue stacking and frosting until all layers are assembled.
Crumb Coat the Sides
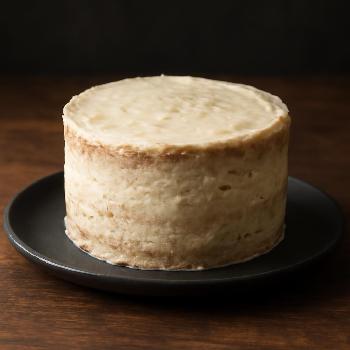
Using your offset spatula, apply a thin layer of frosting to the sides of the cake, working to cover the entire surface. Again, focus on trapping crumbs, not creating a perfectly smooth finish.
Smooth the Crumb Coat
Once the entire cake is covered in a thin layer of frosting, use your offset spatula or a bench scraper to smooth the surface. Remove any excess frosting and fill in any gaps.
Chill the Cake
Place the crumb-coated cake in the refrigerator for at least 30 minutes, or preferably an hour. This allows the frosting to firm up and the crumbs to set, creating a stable base for your final layer of frosting.
Inspect and Repair
After chilling, inspect the crumb coat. If any crumbs are still visible or if there are any imperfections, you can apply a very thin layer of frosting to those areas and smooth them out.
FAQ
-
Why is a crumb coat necessary?
The crumb coat prevents crumbs from mixing with your final layer of frosting, resulting in a clean and professional finish. It also provides a stable base for decorating. -
Can I use any type of frosting for the crumb coat?
Yes, you can use buttercream, ganache, or any other frosting you prefer. Just make sure it's at a spreadable consistency. -
How long should I chill the cake after the crumb coat?
At least 30 minutes, but preferably an hour. This allows the frosting to firm up and the crumbs to set. -
What if I don't have an offset spatula?
You can use a regular knife or a butter knife, but an offset spatula will make the process easier and more precise.
